

 I thought it would be really helpful to record all the helpful information I got from my fellow crafters when I was getting myself sorted for the fair last week.... yes, it's a craft fair tutorial..! I couldn't think of a good way of illustrating this one so here's a picture of a pin cushion which was the first thing that I sold at my first ever fair.. I thought it would be really helpful to record all the helpful information I got from my fellow crafters when I was getting myself sorted for the fair last week.... yes, it's a craft fair tutorial..! I couldn't think of a good way of illustrating this one so here's a picture of a pin cushion which was the first thing that I sold at my first ever fair..What you need to take: Stuff to sell (well of course!) - take as much as you can, and don't forget to practice your stall arrangement if it's your first time. Seeing my 'practice table' helped me feel a lot more confident about the whole thing. Price labels - I grouped my items and used general labels so as not to clutter up my small table too much. Wrapping stuff - I used pre-cut tissue paper - and sticky tape in a dispenser. Carrier bags/other bags/your packaging of choice - I just grabbed a load of bags we have saved at home. Cover for your table - I chose a cream throw so that all my colourful fabrics stood out beautifully. I also spent aeons ironing the thing - which is very important! In future I am going to try and find something that doesn't crease... Large bulldog clips - or something similar to hold yor table cover in place - I didn't have these and could definitely have done with them, to make sure nothing slipped. I expect that they would be absolutely essential at an outside fair on a windy day. Large sign or banner - to tell the world who you are. Lots of lovely business cards - and remember to give them out! I totally failed here - but next time will try a lot harder. I got so busy chatting to people that I forgot all about giving them my cards. Small sign telling people more about your work and your inspiration - I used an old photo frame that stood up nicely on my table without taking too much space. I found it really useful because it acted as a conversation starter with customers. Display stands of your choice - to create more space and some different levels on your table. I used boxes under my table cover which worked pretty well, but hope to invest in some more fabulous display stands when I can. Props to dress your table - if you've got a large table then I think it's really worth while using a few bits and pieces to create a stronger brand image. I used crochet hooks, knitting needles and lovely colourful pins, vintage thread and buttons to add to the crafty vibe. Paperwork - basically whatever you need! For this particular fair I needed just my insurance details, but if you're using electrical stuff you need your safety certificates and you may need your table booking information too. Receipt book and/or sales book - to record your transactions. Pens and paper and a visitors book/mailing list for people to sign is also a really good idea. Box or money belt (!) for your cash - a money belt would be particularly useful if you are doing a fair by yourself - that way you know where your money is at all time. If a money belt sounds like a really unattractive idea, pop over to Kitschy Coo's blog - she has a fantastic tutorial for a Craft Vendor Apron. I would have made one if I'd had the time before the fair. Float - how much you need really depends on the price of your goods - it helps to have prices with whole numbers! I took about £50 in loose change and a few £5 - in the event I barely needed any of it, but it was good to feel confident that I had enough. Something crafty to do during quiet moments - this can be a great conversation starter too. I had several conversations about crocheting flowers. Refreshments - your hot drink of choice in a flask, a bottle of water, some non-messy sarnies (Jane of Hooked Yarn shared her experience of a very messy coronation chicken sandwich!) and biscuits to share with your fellow vendors. Don't waste your profits on buying food and drink at the fair! Trolley/case on wheels - to get your stuff from your car to the venue. I used the one that came free with my sewing machine - the 1st time I've used it! Tissues, wet wipes, first aid stuff and make-up. Bin bags - for any mess you create - this is also useful if you're outside and you need to keep your stuff protected when it rains. And: Research cheap convenient parking - and print out a local map to get you there easily, if you don't have satnav. Dress in lots of layers - that way you're prepared for whatever the weather - even though we were inside on Saturday I was pretty cold and wished I'd worn thicker tights! So, I hope that's useful to you, I'm sure I'll be referring back to it now I've caught the craft fair bug... I've compiled all this information with a huge amount of input from: Toadybobbins (blog and Folksy shop) Big Blue Bed (etsy shop, folksy shop and blog) Gloria (dichro-findings shop and blog) So a great big THANK YOU! goes to them. |
Showing posts with label pin cushion. Show all posts
Showing posts with label pin cushion. Show all posts
Tuesday, 11 May 2010
Craft Fair Essentials

Sunday, 2 May 2010
Claire's Pin Cushion Swap
I'm so busy doing tons of creating in preparation for my 1st ever craft fair (have I mentioned this before??!!) next week, that this blog has been severely neglected. But, even though I feel quite panicky to be separated from my sewing machine just now, I really do need to do a little round up of the swaps I participated in during April - especially now that May is here! First up is Claire's Pin Cushion Swap... My swap partner was Jessica of Frosted Treats. She was really quick of the mark in getting my swap gift to me (a swap swot indeed!) - look at the dinky little pin cushion she made:  It's so pretty and such a great idea to use a pretty cup as the base of the cushion. It's already seen plenty of use - it's very useful to have such a stable pin cushion to shove pins into when I'm feeling full of sewing frustrations...! She also sent me loads of lovely extra goodies (yarn, pretty buttons, trims and more!), all with a blue theme. What a treat! My return gift was sent at almost the very last minute - no change there then! - and I'm afraid that DISASTER STRUCK... (I may be overstating this a little)... it got caught up in all the volcanic ash delays and so Jessica had to wait very patiently for her swap goodies to arrive. Here's what I sent...  Jessica makes gorgeous cupcake beads for her Etsy shop, so I thought a cupcake theme was the obvious choice. I think she liked it - I certainly enjoyed making it. A very successful swap all round. You can see all the other pin cushions that were swapped over at the Flickr pool. Thanks to the very talented Claire for setting it up. |
Thursday, 11 March 2010
A Large To Do List..
 I don't expect anyone to read this post really. It's mostly just a reminder to myself of the stuff that I've signed up for/volunteered for over the next few weeks... First, and of most interest to you, dear reader, is the Great Big Etsy Midlanders Giveaway Competition. I can't tell you just how Big and how Great this giveaway is going to be. Put Sunday in your diary and get ready to sign up for the 1st round of prizes. I don't expect anyone to read this post really. It's mostly just a reminder to myself of the stuff that I've signed up for/volunteered for over the next few weeks... First, and of most interest to you, dear reader, is the Great Big Etsy Midlanders Giveaway Competition. I can't tell you just how Big and how Great this giveaway is going to be. Put Sunday in your diary and get ready to sign up for the 1st round of prizes.Over at UKHandmade I'm taking part in their 1st ever Artist Trading Card swap. I had no idea what ATCs were (learning all the time!) but as soon as I had a look at some of the ATC groups on Flickr I had to sign up. Just take a look at some of the brilliant work in the Fabric and Textile ATC group. Our 1st theme is Trees - and my 1st ever ATC is just about complete - I'm looking forward to seeing what other people have made, especially as some of my favourite crafters have also signed up. I've also signed up for Claire's Pin Cushion swap. As I've really got an enthusiasm for pin cushions at the moment (a brilliant opportunity to mix crochet and fabric), this hopefully isn't going to be too stressful. Just to make this a less tedious list of stuff I have to do - here's a pic of one of my recent pin repositories. Finally I've just this minute decided to take part in Kitschy Coo's Design-It-Yourself Clothes Sew-Along. The group is using Cal Patch's book, Design-It Yourself Clothes, which is an introduction to making your own patterns. I bought it last week but definitely need some motivation at having a go - so here's the kick up the arse that I need. My dream is to own a pair of trousers that fit... But we are starting simple with the skirt. As I appear to only have 10 days, I better get ON.... |
Sunday, 3 January 2010
Looking back to Christmas & a big yay for 100 posts!
Wow, Christmas was a busy time here at Craft Matters Towers! I've been absolutely shattered since Christmas and it's been hard to pick up a crochet hook or plug in the sewing machine. But all the hard work was definitely worthwhile.  Another Christmas project I signed up for was the Crafteroo Secret Santa Craft Swap organised by Vonnie of Blotted Copy Book. I stalked my Secret Santa partner - Helen from Kitty Ballistics Creations - for a little while and managed to work out that she liked the colour teal (which made life easier because it's one of my faves), and she needed a new pin cushion. So, in my ever-literal way, I made her a teal pin cushion! The base of the pin cushion is crochet and the top is foundation pieced patchwork (you see, I have learned something on my patchwork course..). I also made a sort-of-matching needle book and sent some lovely pins in a cute tin, some pieces of wool felt (Kitty Ballistics creates lots of very witty felt creatures like these...), some vintage thread, and some choc & posh tea bags. It was great fun putting it all together, and I think I am going to make more of the pin cushions - they combine two of my favourite crafts, which has got to be good. Another Christmas project I signed up for was the Crafteroo Secret Santa Craft Swap organised by Vonnie of Blotted Copy Book. I stalked my Secret Santa partner - Helen from Kitty Ballistics Creations - for a little while and managed to work out that she liked the colour teal (which made life easier because it's one of my faves), and she needed a new pin cushion. So, in my ever-literal way, I made her a teal pin cushion! The base of the pin cushion is crochet and the top is foundation pieced patchwork (you see, I have learned something on my patchwork course..). I also made a sort-of-matching needle book and sent some lovely pins in a cute tin, some pieces of wool felt (Kitty Ballistics creates lots of very witty felt creatures like these...), some vintage thread, and some choc & posh tea bags. It was great fun putting it all together, and I think I am going to make more of the pin cushions - they combine two of my favourite crafts, which has got to be good. From my Secret Santa (Jane at Hooked Yarn) I got some fabulous goodies... She made this wonderful bauble which I absolutely love, as well as a very pretty red crochet angel, a handmade notebook, some choc (yes!), teabags, and a star-shaped cookie cutter. Judging by the great appropriateness of these gifts I know that Jane has been paying very close attention to my various posts and online activities! It was lovely to receive such a beautifully wrapped, thoughtful gift. So thank you Jane, Helen, Vonnie and Crafteroo for all the Christmassy fun and inspiration. From my Secret Santa (Jane at Hooked Yarn) I got some fabulous goodies... She made this wonderful bauble which I absolutely love, as well as a very pretty red crochet angel, a handmade notebook, some choc (yes!), teabags, and a star-shaped cookie cutter. Judging by the great appropriateness of these gifts I know that Jane has been paying very close attention to my various posts and online activities! It was lovely to receive such a beautifully wrapped, thoughtful gift. So thank you Jane, Helen, Vonnie and Crafteroo for all the Christmassy fun and inspiration.And YAY! this is my 100th post. It's taken me a long time, but I got there in the end... It's amazing to think how much my crafting has changed and developed since I started blogging. I would never have believed that I would be writing my own crochet patterns for a start. Post number 101 will be the BIG CELEBRATORY GIVEAWAY! So don't forget to check back very soon. |
Friday, 7 March 2008
Another pin cushion finally finished
 This has been sitting around waiting to be finished off for days now - just haven't had a chance to get to my sewing machine to sew the sides. I like the way the colours look on this one - and now that the blobs are a bit closer together I think it looks better too. Thinking about it the colours really remind me of some of the photos that we have of our first garden in London. I am obviously attracted by this colour combination because I seem to be drawn to plants with these colours too.
What hasn't worked well is the edge stitching - this time I went for more curved corners but for me the corners still look a bit bumpy & uneven. I am not sure what I am doing wrong & I am wondering about unpicking it & having another go... I hate it when things don't go right the 1st time. Which is my downfall when it comes to crafting, I really haven't got much patience when things don't go right.
Saturday, 23 February 2008
A pin cushion - more attempts to be organised..
Aware that I really must stop sticking in-use pins into the arms of our sofa (it really isn't safe), I knew I had ot make a pin cushion. I was not really looking forward to it because it brought back memories of the 1st weeks of senior school - a pin cushion was the 1st thing we made in 'Needlework' lessons (god it sounds like I was at school in the 19th century). I seem to remember that mine was in the shape of a tortoise, & its legs never did look right.
 But I was inspired to get going after seeing a picture of a fab pin cushion in one of my 'new' books. I went mad on www.greenmetropolis.com the other day and ordered a few really good value craft books. My favourite purchase is 'Embroidery - An introduction to the basic skills and techniques of the craft' by Diana Springall (out of print but currently available for 1p on Amazon Marketplace - how do they do that??). It was published in 1980 but it has some absolutely gorgeous ideas in it. This (left) is the pattern that inspired me.
  I really like those slightly rounded squares & the very simple shapes. As you can see my version (right) doesn't have an awful lot in common with the Springall version. I've used felt rather than silk, I haven't bothered with piping & I didn't need to do trapunto because the felt is raised enough as it is. I am really pleased with the way the colours blend in the felt - although I think the white could be replaced by cream felt for a slightly less startling effect. I messed up the corners (I machine sewed the edges) - I should have made them much more rounded, and as a result they are too pointy. Next time I will also put the squares closer together in the middle of the cushion - at the minute I think it looks a bit like they are sliding off down the sides... but overall I am rather pleased with the effect &
  I will certainly get a lot of use out of it. And hey, now my family are all out of danger (until they find the pin cushion that is).
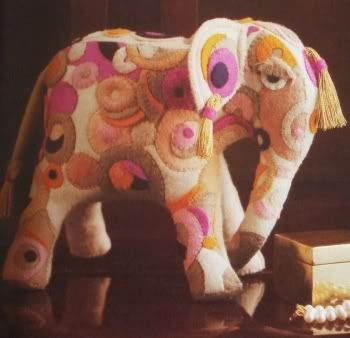
While I am on the subject of the Springall book I have to post a picture of one of her othe designs - this really wonderful felt elephant. I just think this is just great - I love the slightly psychedelic effect that you get from those pink, purple & gold swirls. I am not sure that my skills are quite up to something like this (and I certainly don't have time to try) but I might have a go at adapting the techniques she describes to make something a bit less complicated & a little smaller. I think I'll try another pin cushion first - I have an idea that pink, sage green, pale blue & white might go together quite well.
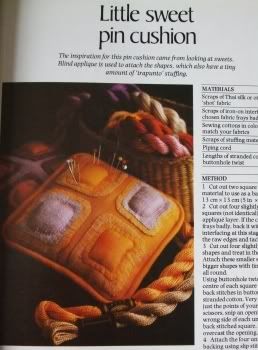 But I was inspired to get going after seeing a picture of a fab pin cushion in one of my 'new' books. I went mad on www.greenmetropolis.com the other day and ordered a few really good value craft books. My favourite purchase is 'Embroidery - An introduction to the basic skills and techniques of the craft' by Diana Springall (out of print but currently available for 1p on Amazon Marketplace - how do they do that??). It was published in 1980 but it has some absolutely gorgeous ideas in it. This (left) is the pattern that inspired me.
 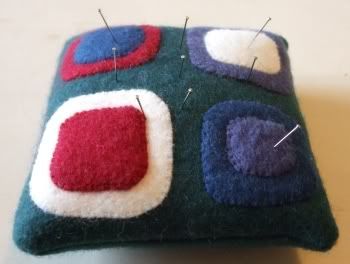 I really like those slightly rounded squares & the very simple shapes. As you can see my version (right) doesn't have an awful lot in common with the Springall version. I've used felt rather than silk, I haven't bothered with piping & I didn't need to do trapunto because the felt is raised enough as it is. I am really pleased with the way the colours blend in the felt - although I think the white could be replaced by cream felt for a slightly less startling effect. I messed up the corners (I machine sewed the edges) - I should have made them much more rounded, and as a result they are too pointy. Next time I will also put the squares closer together in the middle of the cushion - at the minute I think it looks a bit like they are sliding off down the sides... but overall I am rather pleased with the effect &
  I will certainly get a lot of use out of it. And hey, now my family are all out of danger (until they find the pin cushion that is).
While I am on the subject of the Springall book I have to post a picture of one of her othe designs - this really wonderful felt elephant. I just think this is just great - I love the slightly psychedelic effect that you get from those pink, purple & gold swirls. I am not sure that my skills are quite up to something like this (and I certainly don't have time to try) but I might have a go at adapting the techniques she describes to make something a bit less complicated & a little smaller. I think I'll try another pin cushion first - I have an idea that pink, sage green, pale blue & white might go together quite well.
Subscribe to:
Posts (Atom)
