


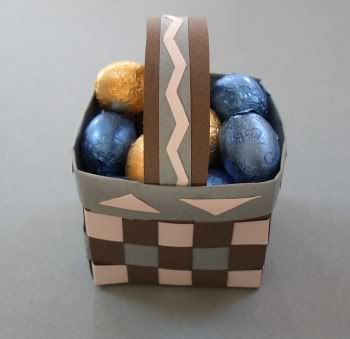
 I've been experimenting with making little woven handmade paper baskets in the last week or so, based on an idea found in 'Country Crafts through the Seasons' by Deborah Schneebeli-Morrell & Gloria Nicol. I want to create a few so that I can hang them on one of the trees in our garden on Easter Sunday for my boys to find. They are slightly fiddly but look lovely & I think are sturdy enough to last for a fair few Easter celebrations. So here's how you do it...
You will need:
1. handmade paper or thin card in base colour
2. 2 pieces of handmade paper or card in toning colours
3. scissors or craft knife & cutting board
4. pencil & ruler
5. glue (tacky or quick drying is best)
6. pegs or large paper clips
7. something delicious to put in the baskets
The measurements given here make a box of 60mm by 60mm by 70mm & you can obviously vary these to make different size baskets. Anything smaller I think would be too much of a fiddle to weave, but then
 some people might have more nimble fingers than mine (very likely!).
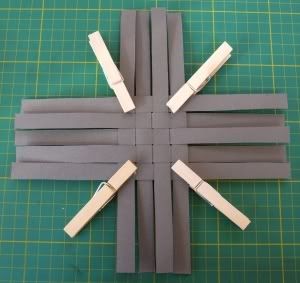
Take your piece of base card & cut 9 strips, 13mm by 220mm. Then lay 5 of them flat in a line & weave in the four remaining strips - making sure that all the edges are lined up (see picture). Put a dot of glue between the 2 pieces of card at each corner & then use the pegs to make sure they stay glued together whilst you get on with the next stage. Or of course you can staple the corners if you want to.
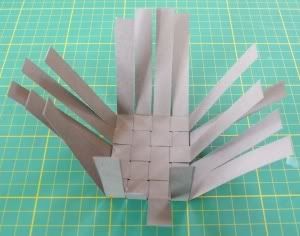 Now take your pieces of coloured card & cut 2 strips, 13mm by 280mm, in each colour. You are now ready to weave these to create the sides of the basket. Take your previously woven & glued base card & bend the free ends at the end of the woven section up as shown on the left. It helps to use a craft knife to score the card first. Don't press too hard when doing this or you will have to do some repairs!
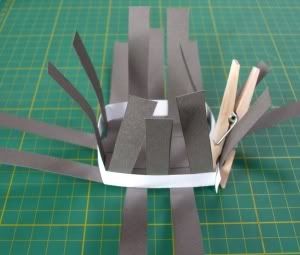 Now weave your 1st coloured strip in & out of the brown card. I found it very helpful to glue & peg the card where I started to hold it in position as I wove around. It is a bit fiddly but persevere & it gets easier. Try to make sure that you don't weave too tightly because that distorts the shape of the finished basket.
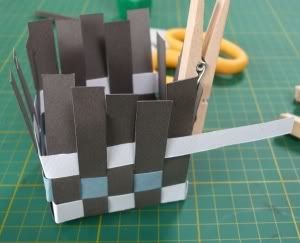 Take your 2nd piece of contrasting coloured card & weave into the basket - starting at the opposite corner to the 1st woven section (this increases the strength of the basket). Carry on weaving the cardboard strips, alternating the colours until you have used all 4. I found it easier to weave the strips in quite near the top of the base card & then to push them down & close together to form the basket sides.
It's now a good idea to make sure everything is secure & to let all glue dry so that everything doesn't start to unravel in the next stage.
When you are happy that your basket is pretty secure, trim off the excess pieces of base colour
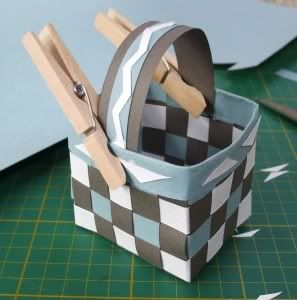 card & then cut a 26mm by 280mm piece of card (in whatever colour you prefer) to create a rim. Fold it in half lengthways & glue along the fold then place it over the top edge of the basket. Again this quite fiddly to guide this round the corners, but it's easier than you think it is going to be - just be persistent.
The final step is creating a handle - this can be any length & width you like - whatever suits your design & purpose. You can also decorate the basket with trim made by cutting shapes & long strips
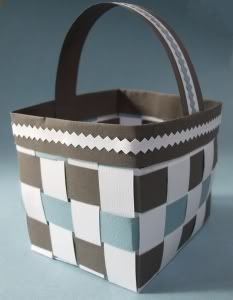 (pinking sheers come in handy here). Once you have decided on the design of the handle & glued all the elements together, glue the handle to the basket on the inside of the rim & peg/clip into place whilst it dries.
My sons aren't into craft much at the moment but if yours are then older kids could probably manage one of these themselves & younger kids can help to decorate the baskets with pieces of cut out card, glitter, stickers, paint, lace frills, chopped up paper doily etc etc.
But of course, the most important thing to add is chocolate...
No comments:
Post a Comment